JavaFX Alertダイアログを最前面に表示する方法
JavaFXではAlertクラスを用いてメッセージダイアログを表示します。こちらもご覧下さい。
このAlertダイアログを常に最前面に表示できるようなClassを作りましたので紹介します。
いきさつ
普通に使うのであれば問題ないのですが、表示元の親Stageが、常に前面表示(alwaysOnTop)にセットされていた場合、ダイアログはこのStageの背面に表示されてしまいます。
並べて表示されれば判りますが、完全に隠れるとフリーズしたように見えてしまいます。
現在作成しているフリーソフトでは、親ステージの設定のために子ステージを開き、親ステージ上のノードをマウスで選択する場面があります。
この時、子ステージをalwaysOnTopに設定しておかないと、親ステージ上をクリックした瞬間に子ステージが隠れてしまいます。
この子ステージの上にダイアログを表示させていのです。
普通にダイアログを表示させたら、子ステージの裏に隠れてしまいます。ダイアログもalwaysOnTopに設定すればよいのですが、StageのようにsetAlwaysOnTop()メソッドが用意されていません。
解決策
Alertオブジェクトと同時にStageオブジェクトも作り、Alert内のDialogPaneをStageに貼り付けます。
Alertは表示せず、StageをalwaysOnTopに設定したうえで表示させます。
これで解決。
ダイアログを親Stageの中央に表示する
ダイアログはそのままだとモニターの中央に表示されます。これだとマウスの移動量が大きいので、親になるStageの中央に表示させるメソッドも次いでにつけました。
/**位置を親stageの中心にする*/
private void setPosition( Stage stage ){
if(stage==null){ return; }
this.setX( stage.getX() + stage.getWidth()/2. -dpane.getPrefWidth()/2. );
this.setY( stage.getY() + stage.getHeight()/2. -dpane.getPrefHeight()/2. );
return;
}
サンプルプログラム
AlertTopは常に前面表示されるメッセージダイアログクラスです。
package tomojavalib.swingfx;
import java.util.Optional;
import javafx.geometry.Insets;
import javafx.scene.Group;
import javafx.scene.Scene;
import javafx.scene.control.Alert;
import javafx.scene.control.ButtonType;
import javafx.scene.control.DialogPane;
import javafx.stage.Modality;
import javafx.stage.Stage;
import javafx.stage.StageStyle;
import javafx.scene.control.Alert.AlertType;
import javafx.scene.control.ButtonBase;
public class AlertTop extends Stage{
DialogPane dpane = null;
Alert alert = null;
public Optional<ButtonType> buttonType = null;
public AlertTop(Stage stage , AlertType alertType , String information , ButtonType b1 ) {
super(StageStyle.UTILITY);
alert = new Alert(AlertType.INFORMATION , information , b1 );
this.setOnTop();
this.setPosition( stage );
}
public AlertTop(Stage stage , AlertType alertType , String information , ButtonType b1, ButtonType b2 ) {
super(StageStyle.UTILITY);
alert = new Alert(AlertType.INFORMATION , information , b1 , b2 );
this.setOnTop();
this.setPosition( stage );
}
public AlertTop(Stage stage , AlertType alertType , String information , ButtonType b1, ButtonType b2 , ButtonType b3 ) {
super(StageStyle.UTILITY);
alert = new Alert(AlertType.INFORMATION , information , b1 , b2 ,b3 );
this.setOnTop();
this.setPosition( stage );
}
/**位置を親stageの中心にする*/
private void setPosition( Stage stage ){
if(stage==null){ return; }
this.setX( stage.getX() + stage.getWidth()/2. -dpane.getPrefWidth()/2. );
this.setY( stage.getY() + stage.getHeight()/2. -dpane.getPrefHeight()/2. );
return;
}
/**常に前面に表示*/
private void setOnTop(){
alert.getDialogPane().setPrefSize(300, 200);
dpane = alert.getDialogPane();
for (ButtonType buttonType : dpane.getButtonTypes()) {
ButtonBase button = (ButtonBase) dpane.lookupButton(buttonType);
button.setOnAction(evt -> {
dpane.setUserData(buttonType);
this.close();
});
}
dpane.getScene().setRoot(new Group());
dpane.setPadding(new Insets(10, 0, 10, 0));
Scene scene = new Scene(dpane);
this.setScene(scene);
this.initModality(Modality.APPLICATION_MODAL);
this.setAlwaysOnTop(true);
this.setResizable(false);
return;
}
/**結果を返す*/
public Optional<ButtonType> getResult(){
this.showAndWait();
//System.out.println("result: "+result.orElse(null));
buttonType = Optional.ofNullable((ButtonType) dpane.getUserData());
return buttonType ;
}
}
実行クラス
ページトップの動画は下記クラスを実行したものです。
package tomojavalib.swingfx;
import javafx.application.Application;
import javafx.scene.Scene;
import javafx.scene.control.Button;
import javafx.scene.control.ButtonType;
import javafx.scene.input.MouseEvent;
import javafx.scene.control.Alert.AlertType;
import javafx.scene.layout.*;
import javafx.scene.text.Text;
import javafx.stage.Stage;
public class AlertTopTestFx extends Application {
Stage stage = null;
Text t = null;
public static void main(String[] args) {
Application.launch(args);
}
@Override
public void start(Stage stage) throws Exception {
this.stage = stage;
stage.setTitle("JavaFX楽天 ");
VBox pane = new VBox();
Scene scene = new Scene(pane, 320, 240);
Button b = new Button("ボタン");
b.setOnMouseClicked((MouseEvent e)->{ mouseClicked( e ); });
t = new Text(" ");
pane.getChildren().add( b );
pane.getChildren().add( t );
stage.setScene(scene);
stage.show();
stage.setAlwaysOnTop(true);
}
private void mouseClicked(MouseEvent e){
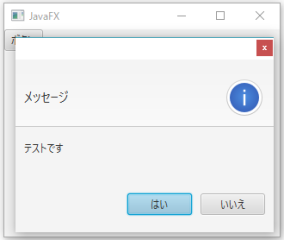
AlertTop aot = new AlertTop( this.stage , AlertType.INFORMATION , "テストです" , ButtonType.YES , ButtonType.NO );
ButtonType button = aot.getResult().orElse( ButtonType.CANCEL );
t.setText( button.getText() );
//if( button.getText().equals("はい") ){ System.exit(0); }
}
}
最終更新日: 2018-02-21 07:15:35