JavaFXで使う各種Pane
各種Paneの単純な例文を作ってみました。SwingからFXに乗り換えのために勉強中ですが、覚書もかねて公開です。
いろいろ種類がありますが、普通に使うのはFlowPane、BorderPane、GridPaneくらいでしょうか。
TextFlowは、文章の中にボタンとかテキストフィールドを入れられるので目新しく感じました。入力フレームに使うと面白いと思います。
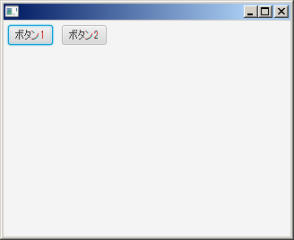
FlowPane
FlowPaneは追加したノードを順に並べて配置してゆきます。
横に並べて、並べきれなくなったら下に並べてゆきます。
FlowPane pane = new FlowPane();
pane.setPadding(new Insets(5, 5, 5, 5));
pane.setHgap(10);
Button b1 = new Button("ボタン楽天 1");
Button b2 = new Button("ボタン2");
pane.getChildren().addAll( b1 , b2 );
package tomojavalib.fx;
import javafx.application.Application;
import javafx.geometry.Insets;
import javafx.scene.Scene;
import javafx.scene.control.*;
import javafx.scene.layout.*;
import javafx.stage.Stage;
public class App6 extends Application {
public static void main(String[] args) {
Application.launch(args);
}
@Override
public void start(Stage stage) throws Exception {
FlowPane pane = new FlowPane();
pane.setPadding(new Insets(5, 5, 5, 5));
pane.setHgap(10);
Button b1 = new Button("ボタン1");
Button b2 = new Button("ボタン2");
pane.getChildren().addAll( b1 , b2 );
Scene scene = new Scene(pane, 320, 240);
stage.setScene(scene);
stage.show();
}
}
実行結果
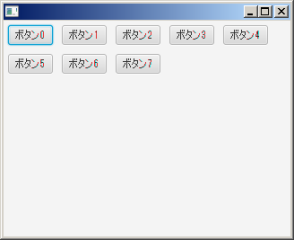
TilePane
TilePaneはFlowPaneによく似ていて、違いがよくわからない。
FlowPaneと同様に、ノードを追加順に均等にならべてゆく。
デフォルトで横に並べるが、縦に並べることも出来る。
横配置
TilePane pane = new TilePane();
pane.setPadding(new Insets(5, 5, 5, 5));
pane.setHgap(10);
pane.setVgap(10);
pane.setPrefColumns(4);
Button[] button = new Button[8];
for (int i = 0; i < button.length; i++) {
button[i] = new Button( "ボタン"+i );
pane.getChildren().add( button[i] );
}
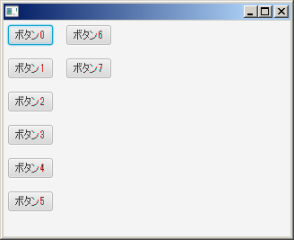
縦配置
TilePane pane = new TilePane( Orientation.VERTICAL );
pane.setPadding(new Insets(5, 5, 5, 5));
pane.setHgap(15);
pane.setVgap(15);
pane.setPrefRows(4);
Button[] button = new Button[8];
for (int i = 0; i < button.length; i++) {
button[i] = new Button( "ボタン"+i );
pane.getChildren().add( button[i] );
}
package tomojavalib.fx;
import javafx.application.Application;
import javafx.geometry.Insets;
import javafx.scene.Scene;
import javafx.scene.control.Button;
import javafx.scene.layout.*;
import javafx.stage.Stage;
/** TilePaneの例(横配置) */
public class App7 extends Application {
public static void main(String[] args) {
Application.launch(args);
}
@Override
public void start(Stage stage) throws Exception {
TilePane pane = new TilePane();
pane.setPadding(new Insets(5, 5, 5, 5));
pane.setHgap(10);
pane.setVgap(10);
pane.setPrefColumns(4);
Button[] button = new Button[8];
for (int i = 0; i < button.length; i++) {
button[i] = new Button( "ボタン"+i );
pane.getChildren().add( button[i] );
}
Scene scene = new Scene(pane, 320, 240);
stage.setScene(scene);
stage.show();
}
}
package tomojavalib.fx;
import javafx.application.Application;
import javafx.geometry.Insets;
import javafx.geometry.*;
import javafx.scene.Scene;
import javafx.scene.control.Button;
import javafx.scene.layout.*;
import javafx.stage.Stage;
/** TilePaneの例(縦配置) */
public class App8 extends Application {
public static void main(String[] args) {
Application.launch(args);
}
@Override
public void start(Stage stage) throws Exception {
TilePane pane = new TilePane( Orientation.VERTICAL );
pane.setPadding(new Insets(5, 5, 5, 5));
pane.setHgap(15);
pane.setVgap(15);
pane.setPrefRows(4);
Button[] button = new Button[8];
for (int i = 0; i < button.length; i++) {
button[i] = new Button( "ボタン"+i );
pane.getChildren().add( button[i] );
}
Scene scene = new Scene(pane, 320, 240);
stage.setScene(scene);
stage.show();
}
}
実行結果
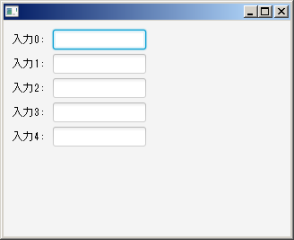
GridPane
GridPaneを使うと行と列を揃えてノードを配置できます。
下の例ではラベル(Text)とテキストフィールドを並べています。
GridPane pane = new GridPane();
//周囲の隙間
pane.setPadding(new Insets(10, 10, 10, 10));
//行の間の垂直方向の間隔の高さ
pane.setVgap(5);
//列間の水平方向の間隔の幅
pane.setHgap(5);
//ラベル貼り付け
Text[] text = new Text[5];
for(int i=0;i<text.length;i++){
text[i] = new Text("入力" + i +" : ");
pane.add(text[i], 0, i);
}
//テイストフィールド貼り付け
TextField[] textf = new TextField[5];
for(int i=0;i<text.length;i++){
textf[i] = new TextField();
textf[i].setPrefColumnCount(10);
pane.add(textf[i], 1, i);
}
package tomojavalib.fx;
import javafx.application.Application;
import javafx.geometry.Insets;
import javafx.scene.*;
import javafx.scene.control.*;
import javafx.scene.layout.*;
import javafx.scene.text.*;
import javafx.stage.Stage;
/**
* いろいろなPaneのテスト
* @author tomo
*
*/
public class App4 extends Application {
public static void main(String[] args) {
Application.launch(args);
}
@Override
public void start(Stage stage) throws Exception {
GridPane pane = new GridPane();
//周囲の隙間
pane.setPadding(new Insets(10, 10, 10, 10));
//行の間の垂直方向の間隔の高さ
pane.setVgap(5);
//列間の水平方向の間隔の幅
pane.setHgap(5);
//ラベル貼り付け
Text[] text = new Text[5];
for(int i=0;i<text.length;i++){
text[i] = new Text("入力" + i +" : ");
pane.add(text[i], 0, i);
}
//テイストフィールド貼り付け
TextField[] textf = new TextField[5];
for(int i=0;i<text.length;i++){
textf[i] = new TextField();
textf[i].setPrefColumnCount(10);
pane.add(textf[i], 1, i);
}
Scene scene = new Scene(pane, 320, 240);
stage.setScene(scene);
stage.show();
}
}
実行結果
AnchorPane
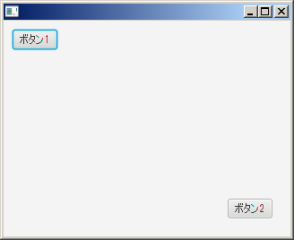
AnchorPaneは追加した個々のノードの位置を指定して並べます。
下の例では2つのボタンを任意の位置に配置しています。
AnchorPane pane = new AnchorPane();
Button b1 = new Button("ボタン1");
Button b2 = new Button("ボタン2");
pane.getChildren().addAll( b1 , b2 );
pane.setLeftAnchor(b1, 10.);
pane.setTopAnchor(b1, 10.);
pane.setRightAnchor(b2, 20.);
pane.setBottomAnchor(b2, 20.);
package tomojavalib.fx;
import javafx.application.Application;
import javafx.scene.Scene;
import javafx.scene.control.Button;
import javafx.scene.layout.*;
import javafx.stage.Stage;
public class App10 extends Application {
public static void main(String[] args) {
Application.launch(args);
}
@Override
public void start(Stage stage) throws Exception {
//StageにPaneとSceneを置く
AnchorPane pane = new AnchorPane();
Button b1 = new Button("ボタン1");
Button b2 = new Button("ボタン2");
pane.getChildren().addAll( b1 , b2 );
pane.setLeftAnchor(b1, 10.);
pane.setTopAnchor(b1, 10.);
pane.setRightAnchor(b2, 20.);
pane.setBottomAnchor(b2, 20.);
Scene scene = new Scene(pane, 320, 240);
stage.setScene(scene);
stage.show();
}
}
実行結果
StackPane
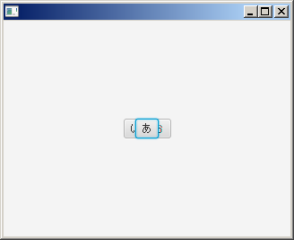
複数のノードを重ねて配置できる。
下は2つのボタンコントロールを重ねた配置したもの。
StackPane pane = new StackPane();
Button btn1 = new Button("あ");
Button btn2 = new Button("いうえお");
pane.getChildren().addAll(btn2, btn1);
package tomojavalib.fx;
import javafx.application.Application;
import javafx.scene.Scene;
import javafx.scene.control.*;
import javafx.scene.layout.*;
import javafx.stage.Stage;
/**
* いろいろなPaneのテスト
* @author tomo
*
*/
public class App4 extends Application {
public static void main(String[] args) {
Application.launch(args);
}
@Override
public void start(Stage stage) throws Exception {
StackPane pane = new StackPane();
Button btn1 = new Button("あ");
Button btn2 = new Button("いうえお");
pane.getChildren().addAll(btn2, btn1);
Scene scene = new Scene(pane, 320, 240);
stage.setScene(scene);
stage.show();
}
}
実行結果
BorderPane
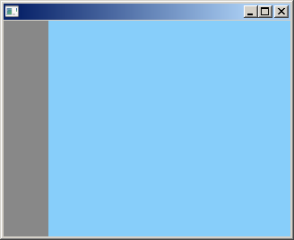
BorderPaneは、上、下、左、右、中央の5つの領域でSceneを分割します。
下の例では分割した真ん中と中央の領域にそれぞれFlowPaneを割り当てています。
割り当てるのは別のPaneを使います。同じPaneを割り当てるのは不可。
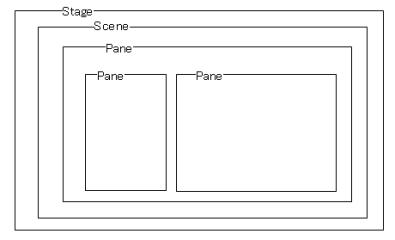
こんなかんじでPaneの中にPaneを入れます。
BorderPane pane = new BorderPane();
FlowPane panec = new FlowPane();
panec.setStyle("-fx-background-color: #87CEFA;");
FlowPane panel = new FlowPane();
panel.setStyle("-fx-background-color: #888888;");
panel.setPrefWidth(50);
pane.setLeft( panel );
pane.setCenter( panec );
package tomojavalib.fx;
import javafx.application.Application;
import javafx.geometry.Insets;
import javafx.scene.*;
import javafx.scene.control.*;
import javafx.scene.layout.*;
import javafx.scene.text.*;
import javafx.stage.Stage;
/**
* いろいろなPaneのテスト
* @author tomo
*
*/
public class App5 extends Application {
public static void main(String[] args) {
Application.launch(args);
}
@Override
public void start(Stage stage) throws Exception {
BorderPane pane = new BorderPane();
FlowPane panec = new FlowPane();
panec.setStyle("-fx-background-color: #87CEFA;");
FlowPane panel = new FlowPane();
panel.setStyle("-fx-background-color: #888888;");
panel.setPrefWidth(50);
pane.setLeft( panel );
pane.setCenter( panec );
Scene scene = new Scene(pane, 320, 240);
stage.setScene(scene);
stage.show();
}
}
実行結果
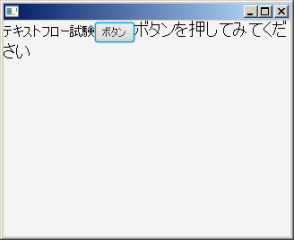
TextFlow
リッチテキストを扱う特殊なPaneです。
テキストを順に並べ、必要なら改行を入れます。
下の例のように途中にボタンなども入れることができます。
TextFlow pane = new TextFlow();
Text t1 = new Text("テキストフロー試験");
t1.setFont(Font.font("ゴシック", FontWeight.BOLD, 14));
Button b1 = new Button("ボタン");
Text t2 = new Text("ボタンを押してみてください");
t2.setFont(Font.font("ゴシック", FontWeight.BOLD, 20));
pane.getChildren().add(t1);
pane.getChildren().add(b1);
pane.getChildren().add(t2);
package tomojavalib.fx;
import javafx.application.Application;
import javafx.scene.Scene;
import javafx.scene.control.Button;
import javafx.scene.layout.*;
import javafx.scene.text.*;
import javafx.stage.Stage;
public class App11 extends Application {
public static void main(String[] args) {
Application.launch(args);
}
@Override
public void start(Stage stage) throws Exception {
TextFlow pane = new TextFlow();
Text t1 = new Text("テキストフロー試験");
t1.setFont(Font.font("ゴシック", FontWeight.BOLD, 14));
Button b1 = new Button("ボタン");
Text t2 = new Text("ボタンを押してみてください");
t2.setFont(Font.font("ゴシック", FontWeight.BOLD, 20));
pane.getChildren().add(t1);
pane.getChildren().add(b1);
pane.getChildren().add(t2);
Scene scene = new Scene(pane, 320, 240);
stage.setScene(scene);
stage.show();
}
}
実行結果
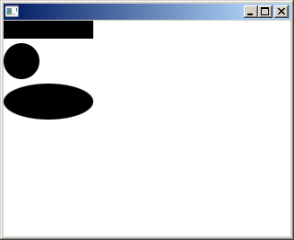
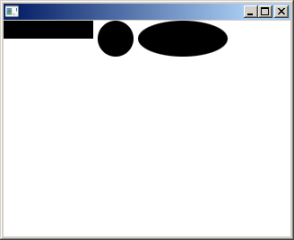
VboxとHbox
ノードを一列に並べます。Vboxは縦、Hboxは横に並べます。
下の例では図形を並べています。VboxをHboxに書き換えるだけで縦→横に変わります。
Vbox pane = new Vbox(5);
Rectangle rect = new Rectangle( 100 , 20 );
Circle circle = new Circle( 20 );
Ellipse ellipse = new Ellipse( 50 , 20 );
pane.getChildren().add(rect);
pane.getChildren().add(circle);
pane.getChildren().add(ellipse);
Hbox pane = new Hbox(5);
Rectangle rect = new Rectangle( 100 , 20 );
Circle circle = new Circle( 20 );
Ellipse ellipse = new Ellipse( 50 , 20 );
pane.getChildren().add(rect);
pane.getChildren().add(circle);
pane.getChildren().add(ellipse);
package tomojavalib.fx;
import javafx.application.Application;
import javafx.scene.Scene;
import javafx.scene.layout.*;
import javafx.scene.shape.*;
import javafx.stage.Stage;
public class App12 extends Application {
public static void main(String[] args) {
Application.launch(args);
}
@Override
public void start(Stage stage) throws Exception {
Vbox pane = new Vbox(5);
Rectangle rect = new Rectangle( 100 , 20 );
Circle circle = new Circle( 20 );
Ellipse ellipse = new Ellipse( 50 , 20 );
pane.getChildren().add(rect);
pane.getChildren().add(circle);
pane.getChildren().add(ellipse);
Scene scene = new Scene(pane, 320, 240);
stage.setScene(scene);
stage.show();
}
}
実行結果
最終更新日: 2019-02-19 08:24:42